Jul 20, 2010
Here Document
Here Document
Syntax:
command << label
input line 1
…
input line n
label
This allows you to redirect input to a shell script from within the shell script itself.
- << label indicates that label marks the end of the here document
- label must appear on a line by itself to end the here document
- << 'label' prevents the shell from doing parameter and command substitution in the here document
- <<- label deletes leading tabs (but not spaces) from the here document
Here Document Example
(from page 189 in "Learning the Korn Shell")
pgmname=$1
for user in $(ypcat passwd | cut -f1 -d:)
do
mail $user <<- EOF
Dear user,
A new version of $pgmname has been installed
in $(whence $pgmname).
Regards,
Your friendly sysadmin
EOF
done
原文: http://snap.nlc.dcccd.edu/reference/scarlatos/cis2.50/note6.html
Jul 18, 2010
浅析Apple iPhone4天线问题的危机公关
浅析Apple iPhone4天线问题的危机公关
iPhone4的天线问题甫一曝光,乔帮主就故态复萌了,拿出25年前打死不认亲生女儿的尽头,摆出死猪不怕开水烫的嘴脸,直言这个问题是由于用户的握手机的姿势不对引起的,言外之意就是碰到问题的这些用户太白痴,连如何正确握手机都得要别人教。很不幸的是,敝人也是习惯左手握手机,也是被乔帮主鄙视的那群人之一。
乔帮主的言论客观上激起了媒体和更多用户的不满,一大撮人巴不得Apple出事呢,现在苦苦等待了好几年的机会终于来到了,岂有坐视的道理?于是媒体铺天盖地的报道iPhone4的天线问题,科技专栏作家不断发表自己的看法,评测公司不断发布最新的评测……
Apple深知此事不能不了了之,于是又宣称会尽快推出新的固件来修正之前iPhone的信号显示的bug——iPhone4的信号之所以在握住某个点之后会大幅下降,主要原因是之前的信号显示是被夸大了的,也就是说之前的信号其实本来没有那么好,iPhone会故意将信号条设为满格,给用户以iPhone信号良好的假象。我相信这样做的绝不只Apple一家,其他厂家肯定也会搞这种小动作,只是程度不同而已。
但很快就有新的分析和测试出炉,固件升级不可能解决iPhone4掉话的问题,因为这个问题是由硬件引起的,确切而言是天线的设计缺陷——软件不可能修复这种硬件的缺陷。而直到此时,Apple还没有同意免费为用户提供可以解决掉话问题的iPhone4保护套,用户还不得不掏30美元去买保护套。
媒体继续穷追猛打,Apple必须得给出一个说法了。于是本周五,乔帮主专门召开了一个发布会来解释iPhone4的信号问题。一向喜欢在最后5分钟报道米国人民生活于水深火热之中的《新闻联播》当然不会放弃这样一个好机会,专门报道了这个消息——迷信水果出品的一小撮不明真相的群众们,你们该醒醒了!即便牛B如iPhone4者,照样问题多多!还是赶紧买我天朝自产的XX吧!……
感谢CCAV,在我吃饭的时候报道了这条消息,吃完饭后我赶紧上网仔细看了看相关报道。今天在新浪科技上看到了《直播实录:苹果iPhone 4信号问题发布会》。看完之后,坦白讲,我被乔帮主的真诚感动了。下面简单分析一下乔帮主的思路。
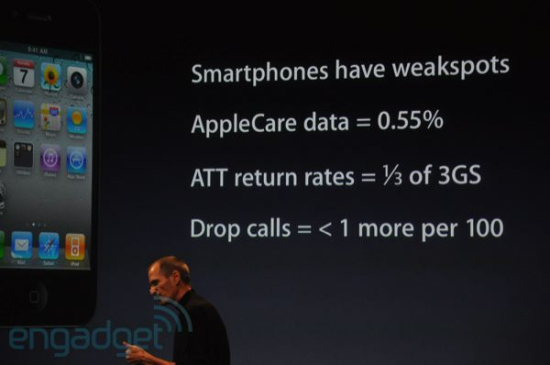
首先,在所有智能手机中iPhone4拥有最好的销量和最佳的口碑——iPhone4天赋异禀,瑕不掩瑜——先定好基调很重要。
所有的手机都不是完美的,iPhone4不是,其他手机也不是,iPhone4存在的天线问题在其他手机上照样存在——老乔我阴沟里翻船了,你们在岸上的也休想有好日子过!空口无凭,图片为证,老乔把其他手机的信号锐减的情况逐一摆在大家面前。需要注意的是老乔在演讲中提到说类似的问题也存在在诺基亚手机中,但在presentation中却不见又诺记的图片,因此我怀疑Apple至今肯定还没有诺记信号问题的切实证据,老乔故意制造烟雾弹。也有另外一种可能是,在乔帮主眼中,就诺基亚那样低劣的工业设计,根本不配是Apple的对手,因此在presentation中放它一码。
接下来乔帮主介绍了Apple在手机天线上的投入——神秘的“black”实验室、过硬的技术人员和大量的资金投入——两层含义:我们很重视手机天线的设计的,尽管iPhone4的天线存在问题,但绝对不可能是大问题;我们有这么大的投入尚不能解决的问题,其他公司又怎么能彻底解决呢?
然后乔帮主拿出了hard data来说明iPhone4的问题,除了掉话率iPhone4比iPhone 3GS稍高一点之外,返修率和退货率都要低很多。在这里,乔帮主的下面这张slide制作的实在是太有水平了,不仔细看怎么都不觉得他是在承认iPhone4的问题,分明是在炫耀他的成绩嘛!
其实iPhone4的这些数据很难说明问题,因为一是因为它上市的时间太短了,而且上市的地区有限(iPhone 3GS是在欧美多国同时上市的,而iPhone4只有少数几个国家);再者就是天线信号显示条都可以随意更改,这数据又有何不可呢?
至于问题的解决方法,乔帮主终于同意了免费为用户提供手机套——这是对他们最为有利的方案,如果接受媒体和业内人士的召回的建议,Apple的损失将是惨重的。为了进一步打消某些人仍然抱有的召回的幻想,乔帮主在Q&A的环节中干脆暗示召回也很难解决问题,原因就是这是智能手机的通病,不可能在短期内有最终解决方案。
最后,乔帮主竟然主动爆出了正在调查iPhone4的距离感应器的问题——如果有谁还幻想着在天线问题过去之后再炒作距离感应器的问题,还是省省吧!
另外,乔帮主还深情的自我表白:“我们这样做的原因是,我们爱自己的用户;如果我们把事情搞砸了,我们会自我检讨,并更加努力地工作。当我们取得成功时,我们所获得的奖励就是留住了用户。或许我们本应让公关人员来打发这些麻烦事,但我们没有,而是亲自来解决。所以,在过去22天时间里,我们一直都努力解决这个问题。我们认为,已经抓住了问题的核心。”
这是一个堪称经典的危机公关演讲!
联想起最近国内的唐俊面对“学历门”的态度,汪晖教授面对“抄袭门”的反应,乔帮主的水平实在比他们高出一个档次——既承认了自己的错误,又捎带打击了对手,既安抚了消费者和媒体,又能使自己的利益最大化。谢谢乔帮主又给我们上了一课!
PS:
根据Apple的声明,很多人推测Apple很可能在10月份推出重新设计的iPhone4.我认为这很有可能,因Steve Jobs不可能容忍有瑕疵的产品在市场上销售太久。另外,至于有很多人质疑乔帮主在iPhone4发部前就已经知道它的天线问题,我觉得可能性也不是很大,凭着乔帮主要求Mac开发者搞半年才能拿出一个入他老人家法眼的的滚动条而最终发布时又不得不把这滚动条放弃的高要求,很难想象他会容忍有问题的iPhone流入市场——即使事先他真的已经知道了这个问题,估计那也是离WWDC很近的时间内才知道的,箭在弦上不得不发了……
Jul 17, 2010
awk正则表达式中调用ksh变量
如果ksh中定义了变量pcname,而在嵌入ksh中的awk程序中又要使用这个环境变量,并且用它在正则表达式中,该如何用它呢?
最简单的方法就是:
#!/bin/ksh
pcname="ap201"
nawk '/'"$pcname"'/{print $2}' $FILE
更多方法,参见下面转载的《AWK 使用 Shell 变量》一文:
最近闲着没事,想写个Shell脚本,其中用到了 AWK。想在AWK中读取/设置Shell脚本中定义的变量,搜索些资源,总结了一些东东。
读取变量
在通过如下方式读取Shell变量
1> awk -v varName=varValue '...' ...
2> awk '...{print "'"${USER}"'"}' ...
此种方式可以访问系统环境变量(如USER等),和自定义Shell变量。若这些变量中没有空格及其他特殊字符,则可以少写两个双引号:awk '...{print "'${USER}"}' ...
3> awk '...{print ENVIRON["USER"]}...' ...
但是这种方法只能访问系统变量
设置变量
在AWK中尚未找到设置Shell变量的方法,因为像上面的读取的方法中,一旦awk开始执行,这些环境变量都是一个副本,无论处理多少条记录,不管主Shell中如何变化,所引用的这些变量值都保持不变。而且,通过下面的实验可以看出来,在AWK中执行system函数调用命令是另起一个Shell线程,所以无法依靠system来设置外部环境变量。
如果你的AWK只打印一条结果的话,可以使用如下方式在shell环境中设置变量
myVar="`echo | awk '{print "AA/nBB/nCC"}'`"
注意,这种方式在awk打印多行情况下会将回车用空格替代后赋值。
实验过程如下:
$ vi tmp.sh
// 编辑内容如下
#!/bin/bash
echo
echo "SHELL VERSION : ${SHELL} ${BASH_VERSION}"
echo "AWK VERSION : `awk -W version | sed -n '1p'`"
echo
myVar="AAA BBB CCC DDD"
echo "IN SHELL : PID=$"
echo "IN SHELL : /${myVar}=/"${myVar}/""
echo
echo | awk -v var1="${myVar}" '{
    print "IN AWK : how to print single quote : " "'"'"'"
    print "No." NR
    print "IN AWK : -v : var1=/"" var1 "/""
    print "IN AWK : get : ENVIRON[/"USER/"]=/"" ENVIRON["USER"] "/""
    print "IN AWK : get : ENVIRON[/"myVar/"]=/"" ENVIRON["myVar"] "/""
    print "IN AWK : get : ${USER} =/"" "'"${USER}"'" "/""
    print "IN AWK : get : ${myVar}=/"" "'"${myVar}"'" "/""
    print
    system("echo /"IN AWK : system() : PID=$/"")
}'
myVar="`echo | awk '{print "AA/nBB/nCC"}'`"
#/n is replaced by space character
echo ${myVar}
$ . tmp.sh
//输出结果如下
SHELL VERSION : /bin/bash 3.2.25(1)-release
AWK VERSION : GNU Awk 3.1.5
IN SHELL : PID=10627
IN SHELL : ${myVar}="AAA BBB CCC DDD"
IN AWK : how to print single quote : '
No.1
IN AWK : -v : var1="AAA BBB CCC DDD"
IN AWK : get : ENVIRON["USER"]="zhangll"
IN AWK : get : ENVIRON["myVar"]=""
IN AWK : get : ${USER} ="zhangll"
IN AWK : get : ${myVar}="AAA BBB CCC DDD"
IN AWK : system() : PID=17468
AA BB CC
Jul 17, 2010
Korn Shell中IFS的妙用
IFS是internal field separator的缩写,shell的特殊环境变量。ksh根据IFS存储的值,可以是空格、tab、换行符或者其他自定义符号,来解析输入和输出的变量值。
如果有一IP地址220.112.253.111, 欲将这个IP地址颠倒顺序,你可以定义IFS为".",然后直接echo这个地址即可得到此IP的4个数值,然后c重新把IFS设为空格,重新组合四个IP地址的数值即可。
# The following code segment will only work in ksh,
# and it will fail in bash
IP=220.112.253.111
IFS="."
TMPIP=$(echo $IP)
IFS=" " # space
echo $TMPIP | read ip1 ip2 ip3 ip4
INVERT_IP=$ip4.$ip3.$ip2.$ip1
更详细的IFS的介绍参见下文:(原文地址:http://www.livefirelabs.com/unix_tip_trick_shell_script/oct_2003/10132003.htm)
|
Another shell variable that you should become comfortable using is the IFS, or internal field separator, variable. The shell uses the value stored in IFS, which is the space, tab, and newline characters by default, to delimit words for the read and set commands, when parsing output from command substitution, and when performing variable substitution.
IFS can be redefined to parse one or more lines of data whose fields are not delimited by the default white-space characters. Consider this sequence of variable assignments and for loops:
|
|
$ line=learn:unix:at:livefire:labs
$ for i in $line
> do
> echo $i
> done
learn:unix:at:livefire:labs
$ OIFS=$IFS
$ IFS=:
$ for i in $line
> do
> echo $i
> done
learn
unix
at
livefire
labs
$
|
|
The first command assigns the string “learn:unix:at:livefire:labs” to the variable named line. You can see from the first for loop that the shell treats the entire string as a single field. This is because the string does not contain a space, tab, or newline character.
After redefining IFS, the second for loop treats the string as four separated fields, each delimited by a colon. Using a colon for IFS would be appropriate when parsing the fields in a record from /etc/passwd, the user account information file:
|
|
livefire:x:100:1::/export/home/livefire:/bin/ksh
|
|
Notice that the original value of IFS was stored in OIFS (“O” for original) prior to changing its value. After you are finished using the new definition, it would be wise to return it to its original value to avoid unexpected side effects that may surface later on in your script.
TIP – The current value of IFS may be viewed using the following pipeline:
|
$ echo "$IFS" | od -b
0000000 040 011 012 012
0000004
$
|
The output of the echo command is piped into the octal dump command, giving you its octal equivalent. You can then use an ASCII table to determine what characters are stored in the variable. Hint: Ignore the first set of zeros and the second newline character (012), which was generated by echo.
|
Jun 24, 2010
Apache and Subversion配置
(http://xuebingnanmm.javaeye.com/blog/629810)
(http://wiki.centos.org/HowTos/Subversion#head-2afd8f61ccc6de4477fde9a4bcc84720b86c17a9)
III. How to customize the path of svn repository?
The URL of svn repository is like http://<server_name>/<location>/<project>. You can store the svn repository to anywhere you want.
If the location is not defined in /etc/httpd/conf/httpd.conf, add such definition in it:
<Directory /path>
Options FollowSymLinks
AllowOverride None
</Directory>
Then change the /etc/httpd/conf.d/subversion.conf, such as:
<Location /tmp>
DAV svn
# SVNParentPath /var/www/svn/repos
# AuthzSVNAccessFile /etc/svn-acl-conf
SVNPath /tmp/svn/project
AuthType Basic
AuthName "Subversion repos"
AuthUserFile /etc/svn-auth-conf
Require valid-user
</Location>
However, SVNParentPath is can not be used here and only SVNPath is supported (http://lists.freebsd.org/pipermail/freebsd-questions/2009-November/208244.html).
Command to stop SELinux: setenforce 0
Jun 13, 2010
利用Excel VBA处理文档
遇到如下格式的一篇WORD文档,格式混乱,不适合打印:

由于没有接触过Word VBA,因此决定用Excel VBA来处理这篇文档。首先全选该文档的内容,粘贴到Excel文档中。然后创建一个新的macro,修改该Macro为以下代码:
Sub FormatSheet()'' FormatSheet Macro' Macro recorded 6/13/2010 by Bo Yang'' Keyboard Shortcut: Ctrl+f' Dim str As String Dim i As Long ' Remove blank rows rownumber = Range("A65536").End(xlUp).Row Do While rownumber >= 1 If Cells(rownumber, 1).Value = "" Then Rows(rownumber).Delete rownumber = rownumber - 1 End If rownumber = rownumber - 1 Loop ' Copy the Chinese intepretation For rownumber = 2 To 65535 Cells(rownumber, 2).Value = Cells(rownumber + 1, 1).Value Next ' Delete rows which contians Chinese character ' in their first cells For rownumber = 2 To 65535 For i = 1 To Len(Cells(rownumber, 1).Value) str = Mid(Cells(rownumber, 1).Value, i, 1) If str Like "[Ò»£ý›]" Then Rows(rownumber).Delete End If Next Next End Sub
然后按自定义快捷键Ctrl+f, 数秒钟后,文档处理完毕,秩序井然矣。

Jun 11, 2010
Find CPU Speed and Memory Size on Solaris
Find CPU Speed and Memory Size on Solaris
As I’m writing my thesis I’m running tests on an old SMP Solaris machine. Obviously, I need to provide the specs of this machine in the paper so that the readers can see my results in context (ie why everything is taking forever. On linux I would just use lshw which is your ultimate hardware information goldmine. If you don’t have it on your system, go install it now. You will thank me later.
The ancient Solaris machine I was working with did not have it, so I was forced to find other ways of finding information such as CPU speed and memory size.
First you can try prtdiag – it will tell you detailed information about all your CPU’s and memory banks. Unfortunately it is in a weird directory that is not in your $path so you will need to run it with the absolute path:
/usr/platform/sun4u/sbin/prtdiag -v
If you just want information on the CPU’s you can also try:
psrinfo -v
Finally, to just get your total memory size do:
prtconf | grep Memory
There might be better ways to do this, but these worked for me. Craig will probably be able to add to this list or correct me. 
May 22, 2010
Fixing The Error: DB_RUNRECOVERY: Fatal error, run database recovery
If you get a message similar to this:
[username@localhost ~]$ sudo yum update
rpmdb: Thread/process 2402/139688794072832 failed: Thread died in Berkeley DB library
error: db4 error(-30974) from dbenv->failchk: DB_RUNRECOVERY: Fatal error, run database recovery
error: cannot open Packages index using db3 - (-30974)
error: cannot open Packages database in /var/lib/rpm
CRITICAL:yum.main:
Error: rpmdb open failed
You can fix it by running the following 3 commands:
[username@localhost ~]$ sudo rm -f /var/lib/rpm/__db*
[username@localhost ~]$ sudo db_verify /var/lib/rpm/Packages
[username@localhost ~]$ sudo rpm --rebuilddb
Apr 21, 2010
绕过“Enter password for default keyring to unlock”的方法
当你在Gnome下使用无线网络时,很有可能会遇到如下窗口:

估计很多人和我一样对此窗口不知所云,输入N多自己知道的密码仍然无效。
这时你需要做的就是删除 /home/.gnome2/keyring/下面的所有文件,然后重启,如果再次遇到这个窗口,什么也不要输入直接点OK就可以了。
其他更完美的解决方案请Google。
Mar 5, 2010
Sprint HTC Hero(Hero 200)获取ROOT权限
I. 开始之前你需要完成的:
以上步骤完成后,安装Root Explorer试验以上操作是否成功,请参考《冒死体验~~~Root Explorer文件管理》
HOW TO ROOT YOUR CDMA HTC HERO
Posted by on 8th November 2009
This guide will walk you through gaining root access to your CDMA HTC Hero currently on the Sprint and Verizon Networks.
I. Before You Begin
You need to be able to access the phone via ADB.
Follow this procedure to get ADB setup on your Hero.
How To Setup ADB/Install USB Drivers
II. Root the CDMA Hero
1. Download the following file and then unzip it.
AsRoot2
2. Take the unzipped file and save it into the Tools folder of your AndroidSDK.
3. Plug your phone in via USB and do NOT mount the SD card.
4. Open the Command Prompt and type the following (hitting enter at the end of every line):
cd/
cd AndroidSDK/Tools/
adb devices
And make sure your phones’s serial number pops up
(if not redo section I).
5. Then type:
adb push asroot2 /data/local/
adb shell chmod 0755 /data/local/asroot2
adb shell
/data/local/asroot2 /system/bin/sh
6. Then type:
mount -o remount,rw -t yaffs2 /dev/block/mtdblock3 /system
cd /system/bin
cat sh > su
chmod 4775 su
All Done! You now have root access! Try to download a root program from the Market and see if it works 
-------------------------------------------------------------------------------------------------------